Recent Posts

by John M Costa, III

Git Hooks with Pre-Commit Framework

Overview

Pre-commit is a framework for managing and maintaining multi-language pre-commit hooks. It is a great tool for ensuring consistency across a set of projects or a team. Not only can it help with consistency, but it can also help with formatting by automatically formatting files before they are committed.

What is a git hook?

Git hooks are scripts12 that run before or after certain git commands. They are stored in the .git/hooks directory of your repository. Git hooks are not stored in the repository itself, so they are not version controlled. This means that if you want to share a git hook with your team, you will need to share the script itself.

What is pre-commit?

Pre-commit solves the problem of sharing git hooks with your team and storing configurations with a project repository. This framework allows for management of git hooks commonly across any project.

Setting up pre-commit

Pre-commit is a python package that can be installed with pip. If you’re using macOS, you can install it with brew.

Install Configuration

Pre-commit uses a configuration file to determine which hooks to run and how to run them. This configuration file is stored in the root of your project and is named .pre-commit-config.yaml. This file is used to configure the hooks that will be run and the order in which they will be run.

To generate an initial version of the file, you can run pre-commit sample-config > .pre-commit-config.yaml. This will generate a sample configuration file with a few available hooks.

Once pre-commit is installed, you can run pre-commit install to install the git hooks. Now, when you run git commit, the hooks will run before the commit is created. If any of the hooks fail, the commit will be aborted.

Prescriptive Hook Choices

Pre-commit has a large number of hooks available. Some are more useful than others, most being language specific. Here’s a list of the hooks I like to use for every project.

repos:
  - repo: https://github.com/pre-commit/pre-commit-hooks
    rev: v2.3.0
    hooks:
# file
      - id: end-of-file-fixer
        description: Fixes missing end-of-file newline in files.
      - id: mixed-line-ending
        args: ['--fix=lf']
        description: Forces to replace line ending by the UNIX 'lf' character.
      - id: trailing-whitespace
        description: Trims trailing whitespace.
      - id: check-added-large-files
        args: ['--maxkb=100']
        description: Checks for large files being added to git.
# format
      - id: check-yaml
        description: Checks that all yaml files are valid.
      - id: check-json
        description: Checks that all json files are valid.
      - id: check-toml
        description: Checks that all toml files are valid.

End of File Fixer

This hook ensures that all files have a newline at the end of the file. This is a common issue when working with multiple operating systems. Windows uses \r\n for newlines, while Linux and macOS use \n. This hook will ensure that all files have a newline at the end of the file.

Not having a newline isn’t just bad style, it can break some tools. 3 For example, if you have a file that contains the following (without end of file character):

first line
second line

now if you run wc -l file, you will get the following output, indicating only one line in the file.

% cat file
first line
second line
% wc -l file
       1 file

This is because of how POSIX defines a line. POSIX defines a line as a sequence of zero or more non-<newline>. 45

Mixed Line Ending

If you’re working in a mixed environment where developers are using different operating systems, this hook will ensure that all files have the same line endings. This hook will convert all line endings to the specified type. In the configuration above, I have it set to lf for Linux/Unix line endings as most (all?) of my software is intended to run on Linux or some Linux variant.

Trailing Whitespace

Whitespace differences can be picked up by source control systems and flagged as diffs, causing frustration for developers. This hook will remove all trailing whitespace from files making for a more consistent experience.

Check Added Large Files

Git is notorious for not handling large files well. There’s a bunch of information out there supporting this. This hook will check for large files being added to the repository.

Check YAML, JSON, TOML

Errant commas, missing quotes, and other syntax errors can be difficult to find in configuration files. These hooks will check for syntax errors in the specified file types.

Conclusion

Pre-commit is a great tool for ensuring consistency across a set of projects or a team. It can also help with formatting by automatically formatting files before they are committed. This can be especially useful when working with a team that has different preferences for formatting. Pre-commit can be used to ensure that all files are formatted consistently.

by John M Costa, III

5x15 Weekly Update and Coachee Checklist

Overview

After reading One Bold Move a Day I decided to create a checklist for my coaching interactions. This includes being coached as well as a template for those I plan to coach. This checklist is a work in progress and will be updated as I learn more about coaching and leadership.

The 5x15 Weekly Update 12

Something I’ve been doing for a while now has been to provide a weekly update to my manager. This update includes a list of wins and accolades. I’ve found this to be a great way to keep track of my accomplishments and to help me remember them when it comes time for my annual review. The gist is that you create an update to manage up which takes no longer than 15 minutes to create and no longer than 5 minutes to read.

You might find that you cover all this in your 1:1s with your manager. It may be that this is good enough for you or your manager. For other’s in organizations where there’s a lot of competition, writing this out on a weeky basis is a great way to advocate for yourself week over week and make writing your yearly review easier.

To build this out, I’ve decided to use the 5x15 format. Here’s an example template:

Name: <Your Name>
Week Ending: <Date>

## Are you planning to work next week, from <day> to </day>?

Yes. If no, why not?

## Accomplishments for the week:

- Project 1
   - Company's Culture
       - Organization's Culture: Culture Item 1
         - Team's Culture: Culture Item 1
            - My weekly contribution 1
            - My weekly contribution 2
            - My weekly contribution 3
         - B1: Culture Item 2
             - My weekly contribution 1
             - My weekly contribution 2
             - My weekly contribution 3
         - B1: Culture Item 3
       - Organization's Culture: Culture Item 2
         - Team's: Culture Item 1
         - My weekly contribution 1

## Priorities for next week:

- Priority 1
- Priority 2
- Priority 3

## Stats:
 - Energy level: low, medium, high + direction of change
 - QOL: low, medium, high + direction of change
 - Credibility: low, medium, high + direction of change

## Planned PTO:
  - <Date> - <Date>
  ...

## Examples, screenshots, etc..
  - example 1
  - example 2

By Section

Are you planning to work next week, from to ?

This helps your manager know if you’re planning to take time off. If you are, it shouldn’t be a surprise to them. As a manager, a gentle reminder about who will be unavailable can be helpful when you’re reflecting on the past week or looking forward to the next.

Accomplishments for the week

This is where you list your wins and accolades as organized by your company’s culture, your organization’s culture, and your team’s culture. Sometimes these items may not have alignment. This could be an opportunity to discuss this with your manager and see how better alignment could be achieved.

Not everyone’s comfortable with self-promotion. This is a great way to practice.

Priorities for next week

Keep this simple. List your top 3 priorities for the next week. This is a great way to keep your manager informed of what you’re working on and to help you stay focused on what’s important. If you’re not sure what your priorities are, this is a great opportunity to discuss this with your manager.

Stats

This is a great way to keep track vital stats of your work persona.

Energy level

“Different people are engergized or exhausted by different things.”3 This is a way to keep your manager informed of what’s going on in your work and/or your life. Good managers will use this information to help you be successful, perhaps providing the opportunity to coast during low energy times or to take on more challenging work during periods of high energy.

Quality of Life

How is the work/life balance? Are you feeling overwhelmed? Are you feeling bored? How are you enjoying your projects and the people you’re working with? Not everything is going to be perfect all the time. Often times we can’t change the situation, but we can change our perspective. Answers to how your mental or physical health could also be inputs here. Good managers often can help with challenging situations or provide perspective to get through them. Looking for the positive in a situation can help us get through times when QOL is lower.

Credibility

“You can build credibility by solving hard problems, being visibly competent and consistently showing good technical judgment.”4

The approach I take here is to determine how much trust others have in what I share for technical solutions. Some resources might also consider this to be part of Social Capital, but my feeling is that Credibility and Social Capital are so integral that these are parts of the same thing.

Checklist5

  • Keep a list of wins and accolades to help you remember your accomplishments. Do this daily.
  • Provide your manager with a 5x15 update every week. Include wins and accolades. This is a weekly practice.
  • Focus on what you can control and let go of what you can’t. This is a daily practice.
  • Use data to support your work and decisions. This is a daily practice.
  • Change your perspective. Look at the situation from a different angle. This is a daily practice.
  • Offer compassion to yourself and others. You don’t know what’s going in someone else’s life so give them some space for grace. This is a daily practice.
  • Measure your stats. This is a weekly practice.

Prompts3

  • What compliments do you hear frequently?
  • What projects bring you energy? When do you feel most fulfilled at work?
  • Do you feel like you have enough time to do your work at a level of quality that you’re proud of?
  • Are you finding that you have enough time for things outside of work that are important to you?
  • How are your peers receiving your work? Do you feel like you’re making a positive impact?

References


  1. Orosz, Gergely. The Software Engineer’s Guidebook: Navigating senior, techlead, and stagg engineer positions at tech companies and starups. (p. 38). Pragmatic Engineer BV, Amsterdam, Netherlands. ↩︎

  2. Reilly, Tanya. The Staff Engineer’s Path: A guide for individual contributors navigating growth and change. (p. 121). O’Reilly Media, Inc. ↩︎

  3. Reilly, Tanya. The Staff Engineer’s Path: A guide for individual contributors navigating growth and change. (p. 122). O’Reilly Media, Inc. ↩︎ ↩︎

  4. Reilly, Tanya. The Staff Engineer’s Path: A guide for individual contributors navigating growth and change. (p. 123). O’Reilly Media, Inc. ↩︎

  5. Hocking, Shanna A. One Bold Move a Day: Meaningful Actions Women can take to fulfill their Leadership and Career Potential (p. 29-32). McGraw-Hill ↩︎

by John M Costa, III

Scaling with GitHub Action Workflows

Overview

Platform engineering has become increasingly more popular in recent years. The idea of a platform team is to provide a set of tools and services that enable other teams to build and deploy their applications, ideally at scale. This allows teams to focus on their core competencies and not have to worry about the underlying infrastructure.

There’s plenty of great resources out there that go into detail about what a platform team is and how to build one.

At the core of any platform team is most likely an IDP, or internal developer portal. This is a place where developers can go to find documentation, guides, and other resources that will help them build and deploy their applications.

For a single developer, an internal developer portal is probably overkill. That said, there’s still concepts which can be applied to help scale development, if desired.

Scaling with GitHub Action Workflows.

In this post, I’ll be going over how I’ve used GitHub Actions to scale my development efforts, something I’ve become accustomed to for workflow standardization. I’m sure there’s optimizations that can be made, but this is what I’ve found to work for me right now.

The Problem

I’ve been working on a few projects recently that I’d like to have similar workflows, templates, and linting. After the third project, I realized that I was copying and pasting a lot of the same code over and over again. This is not ideal for a few reasons, but mainly if I want to make a change to the workflow, I would have to make the change in multiple places.

A Solution

There’s probably a few different solutions to this sort of problem. I decided to use GitHub Actions Workflows to solve it. I created a repository called template-repository and added a few workflows to it, like linting. I then created a new repository called workflow-templates and added a workflow which

1) check out the source repository, "template-repository"
2) check out the target repository
3) copy the workflows from the source repository to the target repository
4) commit and push the changes to the target repository
5) open a pull request for the changes

Here’s a version of the repository copy workflow:

name: Add linter to repository

permissions:
  pull-requests: write
  contents: write

on:
  workflow_dispatch:
    inputs:
      source_namespace:
        required: true
        type: string
        description: The namespace to copy the templates from.
        default: "johncosta"
      source_repository:
        required: true
        type: string
        description: The repository to copy the templates from.
        default: "template-repository"
      source_tag:
        required: true
        type: string
        description: The version tag to checkout for templates.
        default: v0.0.1
      target_namespace:
        required: true
        type: string
        description: The namespace to copy the templates to.
        default: "johncosta"
      target_repository:
        required: true
        type: choice
        description: The repository to copy the templates from.
        options:
          - johnmcostaiii.com
          - johnmcostaiii.net
          - smart-oil-api-python
          - U6143-ssd1306-golang
          - documentation
      target_tag:
        required: true
        type: string
        description: The version tag to checkout for templates.
        default: main
      committer_name:
        required: true
        type: string
        description: The users name to use for the commit.
        default: "John Costa"
      committer_email:
        required: true
        type: string
        description: The users email to use for the commit.
        default: "john.costa@gmail.com"

jobs:
  build:
    runs-on: ubuntu-latest
    steps:
      - uses: actions/checkout@v4
        with:
          repository: ${{ github.event.inputs.source_namespace }}/${{ github.event.inputs.source_repository }}
          ref: ${{ github.event.inputs.source_tag }}
          path: ./src/${{ github.event.inputs.source_namespace }}/${{ github.event.inputs.source_repository }}

      - uses: actions/checkout@v4
        with:
          repository: ${{github.event.inputs.target_namespace}}/${{ github.event.inputs.target_repository }}
          ref: ${{ github.event.inputs.target_tag }}
          path: ${{github.workspace}}/src/${{github.event.inputs.target_namespace}}/${{ github.event.inputs.target_repository }}

      - name: Modify files
        run: |
          SOURCE_FOLDER=${{github.workspace}}/src/${{github.event.inputs.source_namespace}}/${{ github.event.inputs.source_repository }}
          TARGET_FOLDER=${{github.workspace}}/src/${{github.event.inputs.target_namespace}}/${{ github.event.inputs.target_repository }}
          TARGET_BRANCH="update-templates-${{ github.event.inputs.source_tag }}"

          # Copy the files from the source to the target
          cd ${TARGET_FOLDER}
          mkdir -p ${TARGET_FOLDER}/.github/linters
          mkdir -p ${TARGET_FOLDER}/.github/workflows
          cp -r ${SOURCE_FOLDER}/.github/linters ${TARGET_FOLDER}/.github/linters
          cp -r ${SOURCE_FOLDER}/.github/workflows/linter.yml ${TARGET_FOLDER}/.github/workflows/linter.yml          

      - name: Create Pull Request
        uses: peter-evans/create-pull-request@v5
        with:
          token: ${{ secrets.ACCESS_TOKEN }}
          path: ${{github.workspace}}/src/${{github.event.inputs.target_namespace}}/${{ github.event.inputs.target_repository }}
          title: "chore: update linter workflow to ${{ github.event.inputs.source_tag }}"
          commit-message: "chore: linter workflow to ${{ github.event.inputs.source_tag }}"
          base: "main"
          branch: "update-linter-workflows-${{ github.event.inputs.source_tag }}"

You’ll notice that I’m using the peter-evans/create-pull-request action to create the pull request. This is a great action which helps both commit the changes and open a pull request for them.

To make this workflow work, I had to create a personal access token with the pull-requests: write and contents: write permissions. I then added the token as a secret to the repository.

Lastly, this is a workflow dispatch workflow, which means that it can be triggered manually. This is great because it allows me to trigger the workflow whenever I want to update the workflows in a repository. To ensure that I don’t point to the wrong repository, I’ve added a few input parameters to the workflow. This allows me to specify the source and target repositories, as well as the source and target tags. This is useful because I can point to a specific version of the source repository, and then update the target repository to use that version.

Conclusion

This is just one example of how I’ve used GitHub Actions to scale my development efforts. I’m sure there’s other ways to do this, but this is what I’ve found to work for me right now. I’m sure there’s optimizations that can be made, and I’m always looking for feedback. Feel free to reach out to me on Twitter or in the comments below. Thanks for reading!

by John M Costa, III

Book Review: One Bold Move a Day - Meaningful Actions Women can take to Fulfill their leadership and career potential - Shanna A. Hocking

Summary

Hocking’s introduction starts with “Who do you want to become?”1. She reflects on where her journey started and how she got to where she is today. What really resonated to me was that she looked for someone to show her how to advance in her career, develop as a leader, and grow as a person.

She goes on to explain how mindsets shifts will play a role in the process of showing up for yourself and others. She lists 4 types of mindsets and how they can be used to help you grow.2 To build on these mindsets, she provides “Bold Moves to Make Now”, a series of actionable items and prompts to help you get started.

Chapters one through three set the stage for the latter chapters. There’s a number of actionable self-reflection items and a series of prompts Hocking walks the reader through to get them thinking about the bold moves they can take.

Chapters four through six are where the book starts to channel the self reflection into career advice. Hocking provides advice how to lift others up and how to invest in yourself. She talks about Bold move performance patterns and how one can advance their career faster if they understand the patterns and apply them to learning, hobbies, physical activity, and rest.

The rest of the chapters coalesce and frame the previous chapters into what Hocking calls “The Bold Move Mindset”.

Recommendation

At a glance Hocking’s book is a short read with immersive, experience driven, and actionable content. I recommend this book to individuals who do not yet have a framework for career advancement or are looking to augment their existing frameworks with a new perspective. Don’t let the books gender-specific title fool you, the content is applicable to all individuals.

One Bold Move A Day

Click here to see the book on Amazon.com


  1. Hocking, Shanna A. One Bold Move a Day: Meaningful Actions Women can take to fulfill their Leadership and Career Potential (p. ix). McGraw-Hill ↩︎

  2. Hocking, Shanna A. One Bold Move a Day: Meaningful Actions Women can take to fulfill their Leadership and Career Potential (p. 1). McGraw-Hill ↩︎

by John M Costa, III

How do I setup multi-domain GitHub pages?

Credit goes to this Stack Overflow answer, but note, not the accepted answer it’s the one currently below.

  1. Create an extra repository for your domain. I used the name of the domain as the repository name. See https://GitHub.com/johncosta/johnmcostaiii.net.

  2. Create an index.html file in the root of the project.

<!DOCTYPE html>
<html>
  <head>
    <meta charset="utf-8">
    <title>Redirecting to https://johnmcostaiii.com</title>
    <meta http-equiv="refresh" content="0; URL=https://johnmcostaiii.com">
  </head>

  <link rel="canonical" href="https://johnmcostaiii.com">
</html>
  1. Create a CNAME file in the root of the project.
johnmcostaiii.com
  1. Setup the DNS for the domain to point to the GitHub pages servers. See this write up for how it should look: https://johnmcostaiii.com/posts/2023-11-10-new-blog-hosting/
by John M Costa, III

New Blog Hosting

It was recently suggested by a mentor that I get back into blogging. I’ll create an entry dedicated on this topic, but the byproduct of this discussion inspired me to resurface and re-host the blog I had started over 10 years ago.

Choosing the Static Site Generator

Given I already had some content formatted in Markdown and the old site which used a version of Hugo, I didn’t really spend a significant amount of time re-considering a static site to drive it.

I did take a few moments to see what was out there and found this list of Awesome Static Generators. I also peeked at reddit to see if there was any consensus out there, but as expected there was little and it was mostly opinion based.

Gitlab has a write-up suggesting an approach static site generator which was a little closer to what I was hoping to read through, but they didn’t draw any conclusions. This was also not unexpected as they probably can’t really back one vs another as they could host any of them.

To summarize the article, see the following table:

GeneratorLanguageTemplating EngineFeaturesCommunity and Support
HugoGoMarkdownCross-platform, statically compiled Go binary- Thriving community, prebuilt themes, and starter repositories
ZolaRustTeraStrongly opinionated, prebuilt binary, fast setup- Limited plugin ecosystem, content-driven focus
JekyllRubyLiquidInspired static sites, Liquid templating language, vast plugin ecosystem- Beginner-friendly, over 200 plugins, themes, and resources
HexoNodeJSNunjucksNodeJS-based, built-in support for Markdown, front matter, and tag plugins- Specializes in markup-driven blogs, supports multiple templating engines
GatsbyJSReactGraphQLReact-based, optimized for speed, extensive plugin library, supports data pulling from multiple sources- “Content mesh” philosophy, 2000+ community-contributed plugins
AstroJavaScriptVariesBring Your Own Framework (BYOF), no package dependencies, supports partial hydration- Flexibility, future-proof for migrations, online playground for trying features

Setup

I’m a little embarassed to admit this, but I’ve been late to the party in using GitHub pages. Instead, I had a container running the site on a droplet on DigitalOcean. One of the best parts of the move is that I’ll be able to save a little on hosting costs. And by save a little, I mean can start another project for a similar cost :)

Here’s some of the steps I needed to take to move it over:

  1. Create a new GitHub repository. So that I can find it easier later on, I used the domain as the repository name. See the repository here: https://github.com/johncosta/johnmcostaiii.com

  2. I looked through the Hugo theme site for a theme that I wanted: https://themes.gohugo.io/

  3. Following the hugo guide posted here I then created a new hugo site with the following command:

    hugo new site quickstart
    cd quickstart
    git checkout <the theme> themes/<theme name>
    echo "theme = '<theme name'" >> hugo.toml
    hugo server
    

    NOTE: The guide uses the ananke theme, but I wanted something different.

  4. Move the generated content out of quickstart and into the root.

    NOTE: I did this to avoid the complexity of a directory. Now everything can run from the root.

  5. Copy all my content into the content directory

  6. Test the site with hugo server.

NOTE: I created a Makefile to start encapsulating the raw commands.

GitHub Actions Workflows

  1. Copy and paste the action workflow into the project

.github/workflows/hugo.yml

# Sample workflow for building and deploying a Hugo site to GitHub Pages
name: Deploy Hugo site to Pages

on:
  # Runs on pushes targeting the default branch
  push:
    branches:
      - main

  # Allows you to run this workflow manually from the Actions tab
  workflow_dispatch:

# Sets permissions of the GITHUB_TOKEN to allow deployment to GitHub Pages
permissions:
  contents: read
  pages: write
  id-token: write

# Allow only one concurrent deployment, skipping runs queued between the run in-progress and latest queued.
# However, do NOT cancel in-progress runs as we want to allow these production deployments to complete.
concurrency:
  group: "pages"
  cancel-in-progress: false

# Default to bash
defaults:
  run:
    shell: bash

jobs:
  # Build job
  build:
    runs-on: ubuntu-latest
    env:
      HUGO_VERSION: 0.120.2
    steps:
      - name: Install Hugo CLI
        run: |
          wget -O ${{ runner.temp }}/hugo.deb https://github.com/gohugoio/hugo/releases/download/v${HUGO_VERSION}/hugo_extended_${HUGO_VERSION}_linux-amd64.deb \
          && sudo dpkg -i ${{ runner.temp }}/hugo.deb          
      - name: Install Dart Sass
        run: sudo snap install dart-sass
      - name: Checkout
        uses: actions/checkout@v4
        with:
          submodules: recursive
          fetch-depth: 0
      - name: Setup Pages
        id: pages
        uses: actions/configure-pages@v3
      - name: Install Node.js dependencies
        run: "[[ -f package-lock.json || -f npm-shrinkwrap.json ]] && npm ci || true"
      - name: Build with Hugo
        env:
          # For maximum backward compatibility with Hugo modules
          HUGO_ENVIRONMENT: production
          HUGO_ENV: production
        run: |
          hugo \
            --gc \
            --minify \
            --baseURL "${{ steps.pages.outputs.base_url }}/"          
      - name: Upload artifact
        uses: actions/upload-pages-artifact@v2
        with:
          path: ./public

  # Deployment job
  deploy:
    environment:
      name: github-pages
      url: ${{ steps.deployment.outputs.page_url }}
    runs-on: ubuntu-latest
    needs: build
    steps:
      - name: Deploy to GitHub Pages
        id: deployment
        uses: actions/deploy-pages@v2

Deployment

GitHub has a guide for setting up static sites which can be found here: https://docs.github.com/en/pages/configuring-a-custom-domain-for-your-github-pages-site/managing-a-custom-domain-for-your-github-pages-site

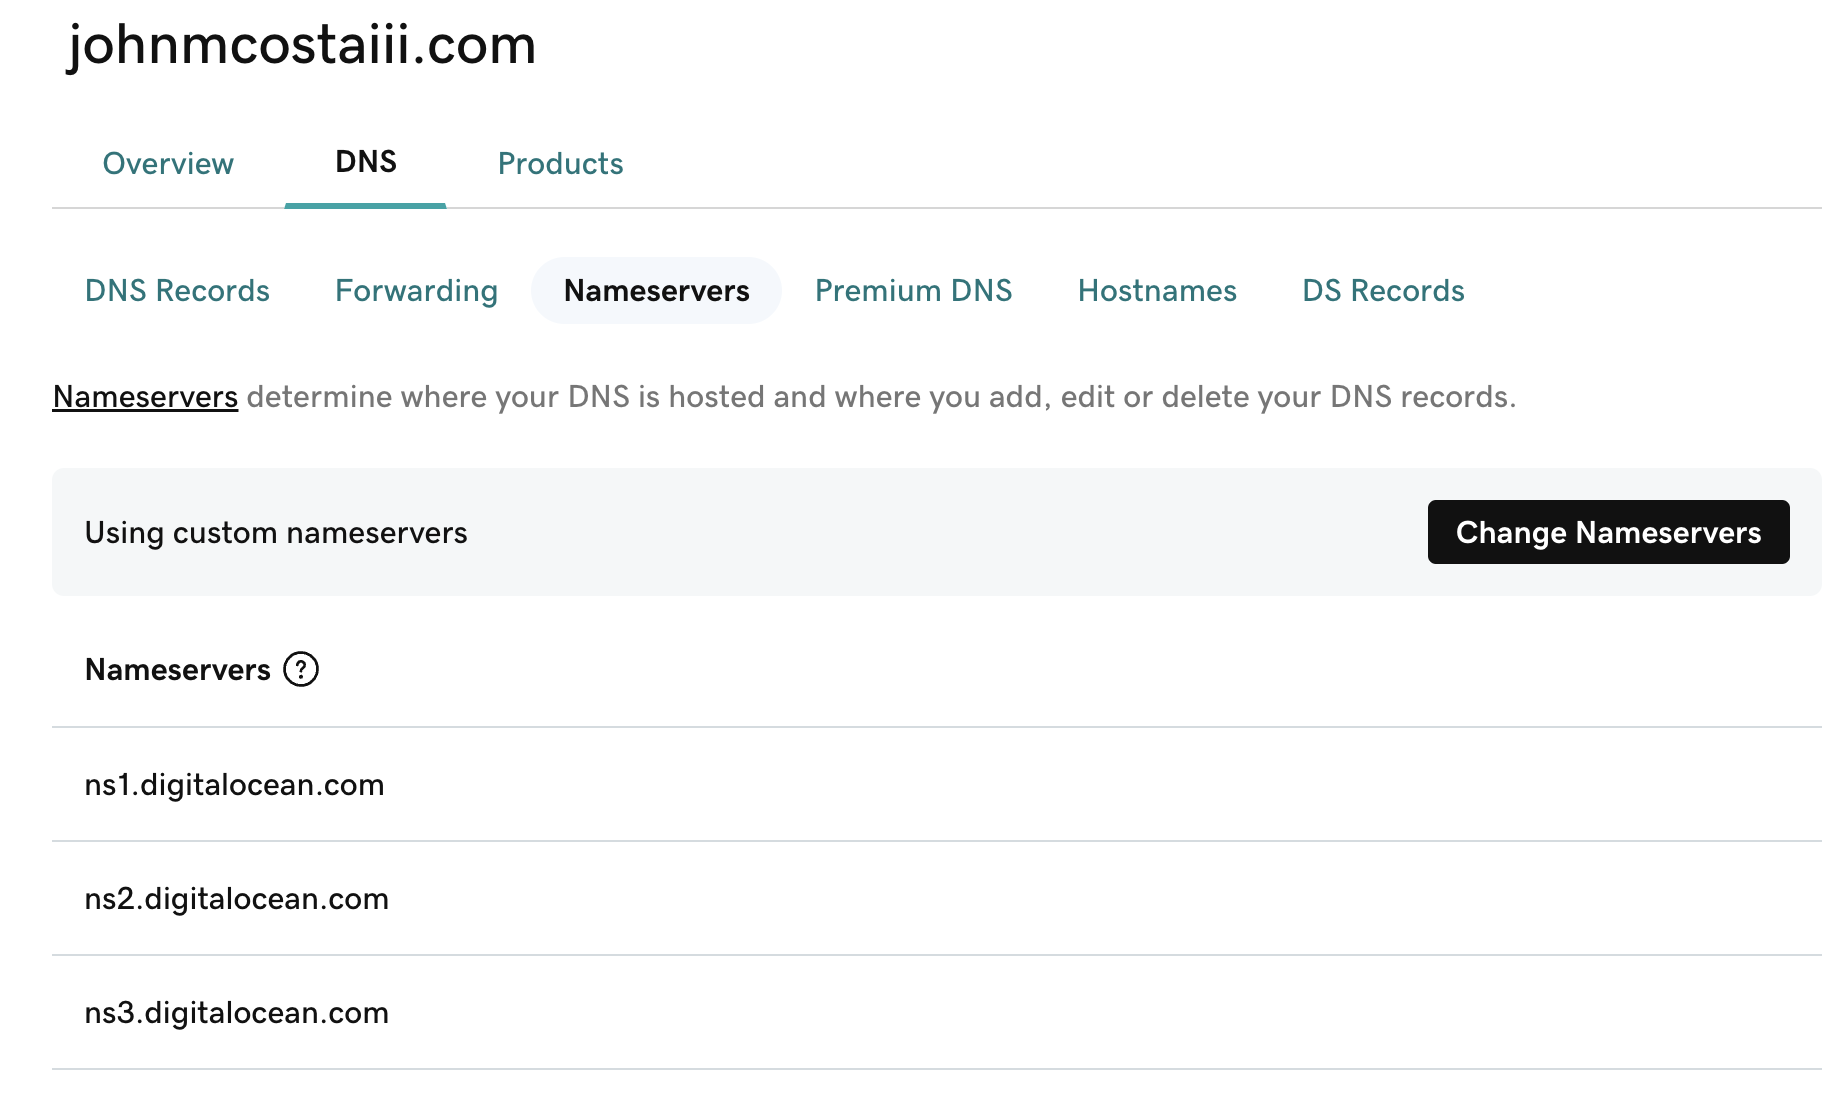
  1. Set up your domain registrar. Here it points to Digital Ocean as I manage projects through them.

Godaddy Settings

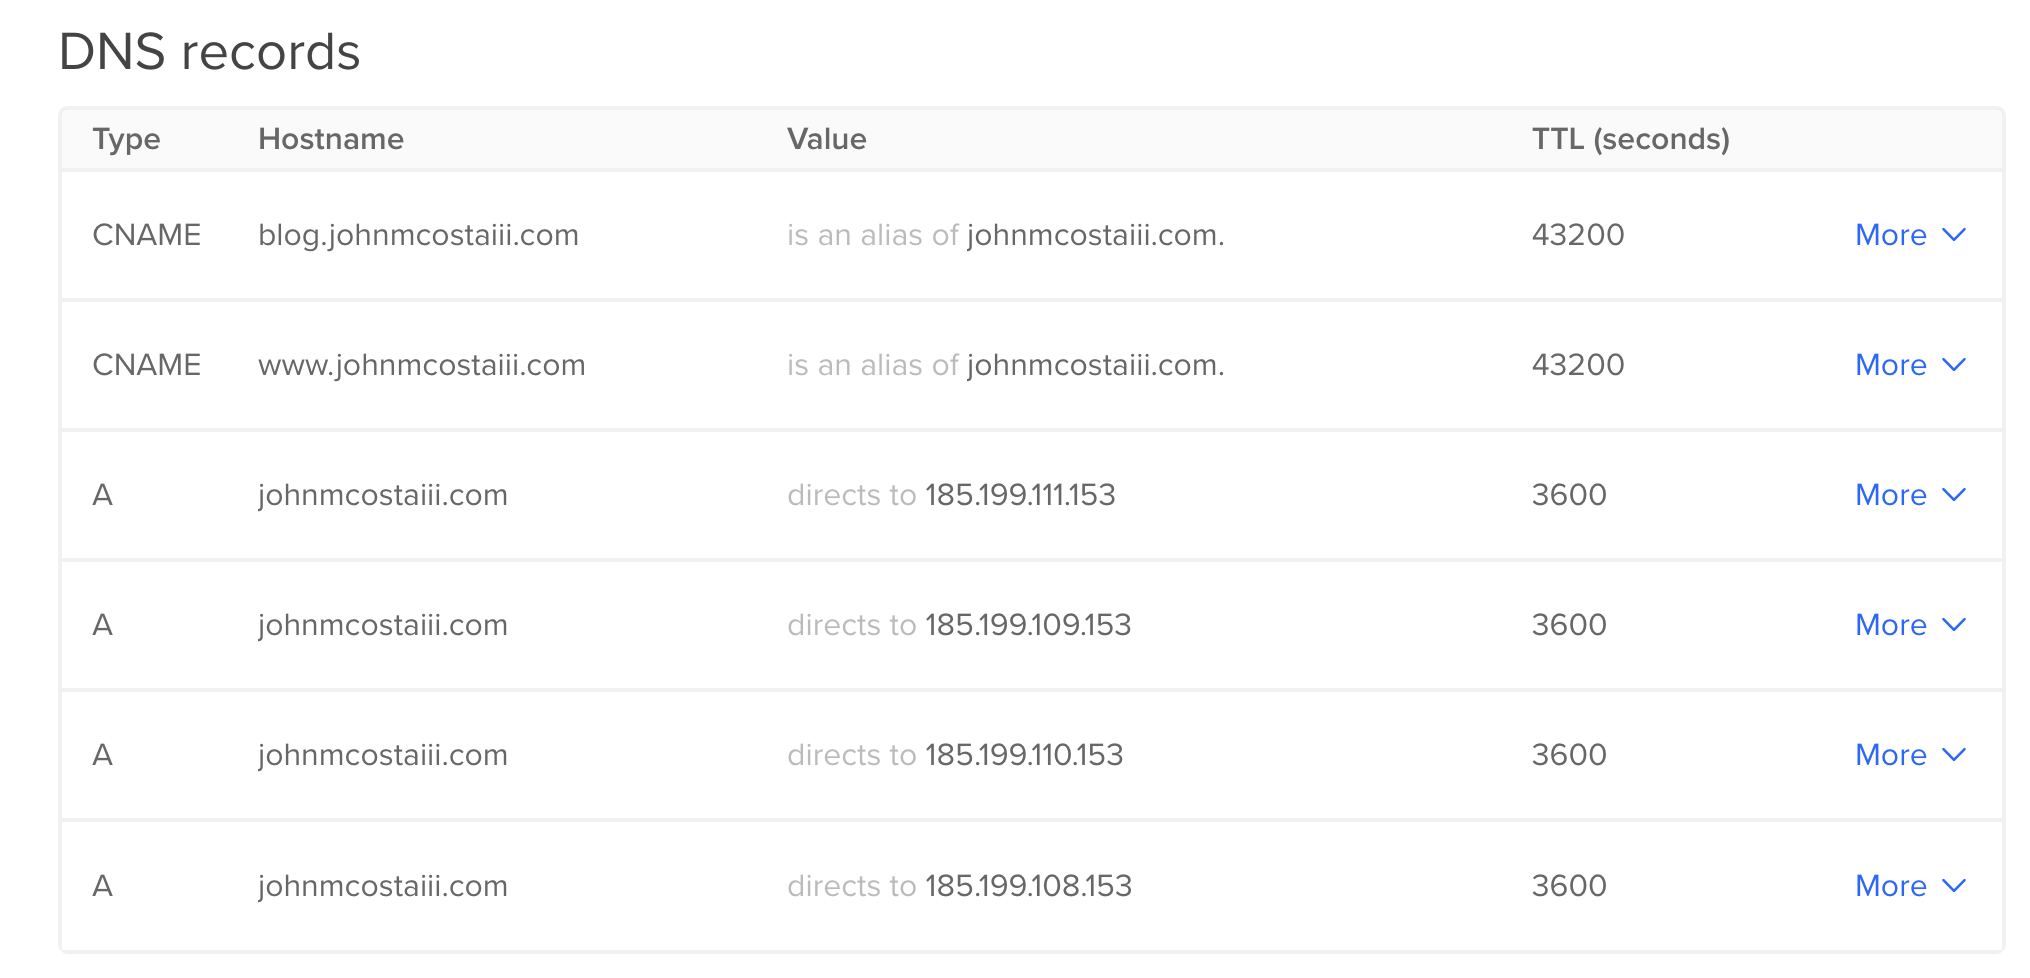
  1. Get the ip values for your GitHub pages. Mine is johncosta.github.io
% dig johncosta.github.io

; <<>> DiG 9.10.6 <<>> johncosta.github.io
;; global options: +cmd
;; Got answer:
;; ->>HEADER<<- opcode: QUERY, status: NOERROR, id: 12535
;; flags: qr rd ra; QUERY: 1, ANSWER: 4, AUTHORITY: 0, ADDITIONAL: 1

;; OPT PSEUDOSECTION:
; EDNS: version: 0, flags:; udp: 512
;; QUESTION SECTION:
;johncosta.github.io.		IN	A

;; ANSWER SECTION:
johncosta.github.io.	3600	IN	A	185.199.111.153
johncosta.github.io.	3600	IN	A	185.199.108.153
johncosta.github.io.	3600	IN	A	185.199.110.153
johncosta.github.io.	3600	IN	A	185.199.109.153

;; Query time: 40 msec
;; SERVER: 192.168.87.16#53(192.168.87.16)
;; WHEN: Fri Nov 10 18:50:54 EST 2023
;; MSG SIZE  rcvd: 112
  1. Setup Digital Ocean to point to GitHub

DigitalOcean Settings

  1. Set the custom domain in the GitHub Pages Settings section of the repository:

GitHub Settings

by John M Costa, III

Installing New Relic Server Monitoring within Docker Containers

The inspiration for this post is from a recent Stack Overflow question that I had answered when I had found the selected answer could be improved upon. You can find it here.

I ran into a problem recently when working with Docker and New Relic Server Monitoring together. Using the directions found in the New Relic docs for Ubuntu/Debian, the Dockerfile additions I first came up with looked as follows:

FROM stackbrew/ubuntu:12.04
MAINTAINER John Costa (john.costa@gmail.com)

RUN apt-get update
RUN apt-get -y install wget

# install new relic server monitoring
RUN echo deb http://apt.newrelic.com/debian/ newrelic non-free >> /etc/apt/sources.list.d/newrelic.list
RUN wget -O- https://download.newrelic.com/548C16BF.gpg | apt-key add -
RUN apt-get update
RUN apt-get install newrelic-sysmond
RUN nrsysmond-config --set license_key=YOUR_LICENSE_KEY

CMD ["/etc/init.d/newrelic-sysmond", "start"]

This results in an error when trying to wget from download.newrelic.com:

--2014-02-21 23:19:33--  https://download.newrelic.com/548C16BF.gpg
Resolving download.newrelic.com (download.newrelic.com)... 50.31.164.159
Connecting to download.newrelic.com (download.newrelic.com)|50.31.164.159|:443... connected.
ERROR: cannot verify download.newrelic.com's certificate, issued by `/C=US/O=GeoTrust, Inc./CN=GeoTrust SSL CA':
  Unable to locally verify the issuer's authority.
To connect to download.newrelic.com insecurely, use `--no-check-certificate'.
gpg: no valid OpenPGP data found.

The error seems to present a solution that is tempting, especially because it works. This would be adding --no-check-certificate to your wget command. This workaround does avoid the error, but also works around the protection that ssl is providing.

The fix is really straight forward, but not obvious if you’re not familiar with apt. With the installation of the ca-certificates package as part of your dockerfile, you can use wget and still validate the certificate.

The following is a working sample:

FROM stackbrew/ubuntu:12.04
MAINTAINER John Costa (john.costa@gmail.com)

RUN apt-get update
RUN apt-get -y install ca-certificates wget  # <-- updated line

# install new relic server monitoring
RUN echo deb http://apt.newrelic.com/debian/ newrelic non-free >> /etc/apt/sources.list.d/newrelic.list
RUN wget -O- https://download.newrelic.com/548C16BF.gpg | apt-key add -
RUN apt-get update
RUN apt-get install newrelic-sysmond
RUN nrsysmond-config --set license_key=YOUR_LICENSE_KEY

CMD ["/etc/init.d/newrelic-sysmond", "start"]

Some caveats:

  • This container is really short lived and will exit almost immediately. The example is for illustrative use.

  • Don’t forget to put your actual license key in place of “YOUR_LICENSE_KEY” or else you’ll get an error of the following: Error: invalid license key - must be 40 characters exactly

  • This is a working example, but I realize that most wont want to use the single /etc/init.d/newrelic-sysmond start command to run their container. you’ll most likely have some sort of init.sh script and place this command in the init.sh.

  • You might not want to install the server monitoring in your development environments. To work around this, in the same init.sh script above, you could check for an environment variable that you inject when the container is first started. Your init file might look as follows (including the start command):

# Conditionally install our key only in production and staging
if [ "${MY_ENV}" == "production" ] || [ "${MY_ENV}" == "staging" ] ; then
    nrsysmond-config --set license_key=YOUR_LICENSE_KEY
fi

# The New Relic daemon likes to manage itself. Start it here.
/etc/init.d/newrelic-sysmond start
by John M Costa, III

Django Projects to Django Apps: Converting the Unit Tests

Recently I went through a process of breaking a large django project into smaller installable applications. Each smaller component could be reused from within any number of django projects, but wasn’t a django project itself. One of the issues I encountered was “What do I do with the unit tests?” Using the standard ./manage.py test no longer worked for me because my settings where in the master project.

I had heard of py.test, so this seemed like an opportunity to see if some of the py.test magic would work for me. Admittedly, I didn’t do a large amount of searching around for additional testing frameworks or processes…this was an excuse to try out the project. :)

Installation

Installing py.test is easy. Because I wanted some additional features (DJANGO_SETTINGS_MODULE environment variable specifically), so I opted for the pytest-django module instead of the base pytest project.

pip install pytest-django

Configuration

To get my unit tests running, I needed to add a few additional things:

  • a test settings file
  • a conftest.py file
  • a pytest.ini file
  • a small amount of test package cleanup

test settings file

Created a very light settings file with only my database configuration

DATABASES = {
    'default': {
        'ENGINE': 'django.db.backends.sqlite3',
        'NAME': ':memory:',
        }
}

conftest.py

This was required to fix an issue with my settings file location.

  import os
  import sys

  sys.path.append(os.path.dirname(__file__))

pytest.ini file

As a convenience, instead of passing parameters on the commandline each time, py.test uses a pytest.ini file to pass these arguments to the test runner.

[pytest]
DJANGO_SETTINGS_MODULE = tests.pytest_settings

test package cleanup

py.test has smarter test resolution. To take advantage of these features, I did the following:

  • Removed statements like from mytests import * from the __init__.py files
  • Changed the name of my tests to match test* format

Wrap-up

Hopefully this post helps future me and others to quickly get up and running with py.test and pytest-django.

by John M Costa, III

Installing Redis on Docker

I’m currently employed by dotCloud and had an opportunity to play around with our open sourced linux container runtime project called Docker.

You’ll need to have an functional version of docker to follow these steps. I’ve included an overview of my notes for installation, however you can find additional installation instructions at the docker website.

Introduction to Docker

If you’ve already worked with docker, you can skip this part. You already have docker installed and probably are running your own containers. If you haven’t, here’s a general overview to a handful of docker commands. Please read on.

I’m working on a MBA, so I ran through the MacOS instructions which are repeated below. It will require that you already have VirtualBox and Vagrant already installed. If you don’t have these, you can find the getting started docs here.

First clone the repo and cd into the cloned repository:

$ git clone https://github.com/dotcloud/docker.git && cd docker

Now, a quick vagrant up and vagrant ssh and I was already issuing docker commands.

Also note: I’ve intentionally left out the vagrant output as there’s nothing too important there. It took about 1 minute to complete.

$ vagrant up
$ vagrant ssh

vagrant@vagrant-ubuntu-12:/opt/go/src/github.com/dotcloud/docker$ docker ps
ID          IMAGE       COMMAND     CREATED     STATUS      COMMENT

vagrant@vagrant-ubuntu-12:/opt/go/src/github.com/dotcloud/docker$ docker images
REPOSITORY          TAG                 ID                  CREATED             PARENT

vagrant@vagrant-ubuntu-12:/opt/go/src/github.com/dotcloud/docker$ docker version
Version:0.1.2
Git Commit:

So far so good! Now lets run a shell within a docker container.

docker run -i -t base /bin/bash
Image base not found, trying to pull it from registry.
Pulling repository base
Pulling tag base:ubuntu-quantl
Pulling b750fe79269d2ec9a3c593ef05b4332b1d1a02a62b4accb2c21d589ff2f5f2dc metadata
Pulling b750fe79269d2ec9a3c593ef05b4332b1d1a02a62b4accb2c21d589ff2f5f2dc fs layer
10240/10240 (100%)
Pulling 27cf784147099545 metadata
Pulling 27cf784147099545 fs layer
94863360/94863360 (100%)
Pulling tag base:latest
Pulling tag base:ubuntu-12.10
Pulling tag base:ubuntu-quantal

So, what have we done here? We’ve called run, which runs our command in a new container, and passed a few docker specific parameters. These include, -i, to keep stdin open, and -t to allocate a pseudo-tty. And finally the command we’re running is /bin/bash to give us a bash shell.

An interesting side effect is that we now have a docker base image locally. We can see this when we run docker images.

$ docker images
REPOSITORY          TAG                 ID                  CREATED             PARENT
base                latest              b750fe79269d        12 days ago         27cf78414709
base                ubuntu-12.10        b750fe79269d        12 days ago         27cf78414709
base                ubuntu-quantal      b750fe79269d        12 days ago         27cf78414709
base                ubuntu-quantl       b750fe79269d        12 days ago         27cf78414709
<none>              <none>              27cf78414709        12 days ago

Lastly, lets exit out of our docker container, and you should see the following:

SIGINT received

Let’s check the status of our docker container:

vagrant@vagrant-ubuntu-12:/opt/go/src/github.com/dotcloud/docker$ docker ps
ID             IMAGE         COMMAND      CREATED          STATUS          COMMENT
9468f9c097f7   base:latest   /bin/bash    25 minutes ago   Up 25 minutes

It looks like its still running…ok lets stop it:

vagrant@vagrant-ubuntu-12:/opt/go/src/github.com/dotcloud/docker$ docker stop 9468f9c097f7
9468f9c097f7

Let’s make sure that it’s really gone:

$ docker ps
ID          IMAGE       COMMAND     CREATED     STATUS      COMMENT

Installing and running Redis within a docker container

Now that we have a notion of what going on with docker commands and installation, lets start loading it up with the tools we’ll need for running a redis server within a docker container.

Start up a new container using the base image.

$ docker run -i -t base /bin/bash
root@b9859484e68f:/#

Lets update our system packages from what’s included in our base image:

root@b9859484e68f:/# apt-get update
Ign http://archive.ubuntu.com quantal InRelease
Hit http://archive.ubuntu.com quantal Release.gpg
Hit http://archive.ubuntu.com quantal Release
Hit http://archive.ubuntu.com quantal/main amd64 Packages
Get:1 http://archive.ubuntu.com quantal/universe amd64 Packages [5274 kB]
Get:2 http://archive.ubuntu.com quantal/multiverse amd64 Packages [131 kB]
Get:3 http://archive.ubuntu.com quantal/main Translation-en [660 kB]
Get:4 http://archive.ubuntu.com quantal/multiverse Translation-en [100 kB]
Get:5 http://archive.ubuntu.com quantal/universe Translation-en [3648 kB]
Fetched 9813 kB in 17s (557 kB/s)
Reading package lists... Done
root@b9859484e68f:/#

Now install telnet and our redis-server:

root@b9859484e68f:/# apt-get install telnet redis-server
Reading package lists... Done
Building dependency tree... Done
The following extra packages will be installed:
  libidn11 libjemalloc1
The following NEW packages will be installed:
  libidn11 libjemalloc1 redis-server telnet wget
0 upgraded, 5 newly installed, 0 to remove and 0 not upgraded.
Need to get 784 kB of archives.
After this operation, 1968 kB of additional disk space will be used.
Get:1 http://archive.ubuntu.com/ubuntu/ quantal/main libidn11 amd64 1.25-2 [119 kB]
Get:2 http://archive.ubuntu.com/ubuntu/ quantal/universe libjemalloc1 amd64 3.0.0-3 [85.9 kB]
Get:3 http://archive.ubuntu.com/ubuntu/ quantal/main telnet amd64 0.17-36build2 [67.1 kB]
Get:4 http://archive.ubuntu.com/ubuntu/ quantal/main wget amd64 1.13.4-3ubuntu1 [280 kB]
Get:5 http://archive.ubuntu.com/ubuntu/ quantal/universe redis-server amd64 2:2.4.15-1 [233 kB]
Fetched 784 kB in 2s (334 kB/s)
dpkg-preconfigure: unable to re-open stdin: No such file or directory
Selecting previously unselected package libidn11:amd64.
(Reading database ... 9893 files and directories currently installed.)
Unpacking libidn11:amd64 (from .../libidn11_1.25-2_amd64.deb) ...
Selecting previously unselected package libjemalloc1.
Unpacking libjemalloc1 (from .../libjemalloc1_3.0.0-3_amd64.deb) ...
Selecting previously unselected package telnet.
Unpacking telnet (from .../telnet_0.17-36build2_amd64.deb) ...
Selecting previously unselected package wget.
Unpacking wget (from .../wget_1.13.4-3ubuntu1_amd64.deb) ...
Selecting previously unselected package redis-server.
Unpacking redis-server (from .../redis-server_2%3a2.4.15-1_amd64.deb) ...
Processing triggers for ureadahead ...
Setting up libidn11:amd64 (1.25-2) ...
Setting up libjemalloc1 (3.0.0-3) ...
Setting up telnet (0.17-36build2) ...
update-alternatives: using /usr/bin/telnet.netkit to provide /usr/bin/telnet (telnet) in auto mode
Setting up wget (1.13.4-3ubuntu1) ...
Setting up redis-server (2:2.4.15-1) ...
Starting redis-server: redis-server.
Processing triggers for libc-bin ...
ldconfig deferred processing now taking place
Processing triggers for ureadahead ...

A quick double check to make sure that our redis-server is now installed:

root@b9859484e68f:/# which redis-server
/usr/bin/redis-server

root@b9859484e68f:/# redis-server --version
Redis server version 2.4.15 (00000000:0)

The image that we’ve created is clean and I want to keep this image before I go much further, so now I’m going to open up another terminal and get back to our vagrant image. Here we can commit and store the filesystem state.

$ docker login
Username (): johncosta
Password:
Email (): john.costa@gmail.com
Login Succeeded

$ docker commit b9859484e68f johncosta/redis

$ docker push johncosta/redis
Pushing repository johncosta/redis (1 tags)
Pushing tag johncosta/redis:latest
Pushing 3e7b84670ea1c7d4b5df8095a3f2051ac2fb4e34fed101d553ad919c4bd923e4 metadata
Pushing 3e7b84670ea1c7d4b5df8095a3f2051ac2fb4e34fed101d553ad919c4bd923e4 fs layer
21975040/21975040 (100%)
Pushing b750fe79269d2ec9a3c593ef05b4332b1d1a02a62b4accb2c21d589ff2f5f2dc metadata
Pushing 27cf784147099545 metadata
Registering tag johncosta/redis:latest

Update:

I forgot to capture the commit command when grabbing the terminal output. Not to worry! I was able ssh into my vagrant VM and check the dockerd logs using: vagrant@vagrant-ubuntu-12:/opt/go/src/github.com/dotcloud/docker$ less /var/log/dockerd


Let’s check what we’ve done and exit out of our container:

root@b9859484e68f:/# exit
exit

It looks like our docker container isn’t running anymore!

$ docker ps
ID          IMAGE       COMMAND     CREATED     STATUS      COMMENT

Lets start up a new container, but this time use the image we just created and committed to providing my redis instance as the image to use.

docker run -i -t johncosta/redis /bin/bash

vagrant@vagrant-ubuntu-12:/opt/go/src/github.com/dotcloud/docker$ docker run -i -t johncosta/redis /bin/bash


root@61507c28cd67:/# /etc/init.d/redis-server start
Starting redis-server: redis-server.
root@61507c28cd67:/# ps faux
USER       PID %CPU %MEM    VSZ   RSS TTY      STAT START   TIME COMMAND
root         1  0.0  0.5  18068  2016 ?        S    15:58   0:00 /bin/bash
redis       14  0.0  0.4  36624  1656 ?        Ssl  16:01   0:00 /usr/bin/redis-
root        17  0.0  0.3  15524  1108 ?        R    16:01   0:00 ps faux

Let’s make sure we can connect to it and interact with redis (remember we installed telnet!).

root@61507c28cd67:/# telnet 127.0.0.1 6379
Trying 127.0.0.1...
Connected to 127.0.0.1.
Escape character is '^]'.
+OK
+1365177842.076283 "MONITOR"
+OK
+1365177870.147208 "set" "docker" "awesome"
$7
awesome
+1365177874.927280 "get" "docker"
+OK
Connection closed by foreign host.

Ok, we know we can connect to redis and interact with it. But we’re inside the container, lets see how to connect to it from outside the container! First, lets inspect our container:

$ docker inspect 61507c28cd67
{
   "Id": "61507c28cd673ea4464248a8c2b936807bf951d6dc82d0f872b02586c5681139",
   "Created": "2013-04-05T08:58:33.711054-07:00",
   "Path": "/bin/bash",
   "Args": [],
   "Config": {
       "Hostname": "61507c28cd67",
       "User": "",
       "Memory": 0,
       "MemorySwap": 0,
       "AttachStdin": true,
       "AttachStdout": true,
       "AttachStderr": true,
       "Ports": null,
       "Tty": true,
       "OpenStdin": true,
       "StdinOnce": true,
       "Env": null,
       "Cmd": [
           "/bin/bash"
       ],
       "Image": "johncosta/redis"
   },
   "State": {
       "Running": true,
       "Pid": 6052,
       "ExitCode": 0,
       "StartedAt": "2013-04-05T09:09:19.733633-07:00"
   },
   "Image": "3e7b84670ea1c7d4b5df8095a3f2051ac2fb4e34fed101d553ad919c4bd923e4",
   "NetworkSettings": {
       "IpAddress": "10.0.3.8",
       "IpPrefixLen": 24,
       "Gateway": "10.0.3.1",
       "PortMapping": {}
   },
   "SysInitPath": "/opt/go/bin/docker"
}

Hmm, It looks like we don’t have a port that we can connect to. Looking at the run command, there’s something that we missed, the -p option, map a network port to the container. Let’s try this with the following:

docker run -p 6379 -i -t johncosta/redis /usr/bin/redis-server

Much better, we can now see that we’ve allocated ports 6379 and mapped it to the external port 49153.

vagrant@vagrant-ubuntu-12:/opt/go/src/github.com/dotcloud/docker$ docker ps
ID             IMAGE                    COMMAND      CREATED         STATUS         COMMENT
0be92ce8581e   johncosta/redis:latest   /bin/bash    3 minutes ago   Up 3 minutes
vagrant@vagrant-ubuntu-12:/opt/go/src/github.com/dotcloud/docker$ $ docker port 0be92ce8581e 6379
49153

Note: We don’t need to inspect the container and parse the entire container information set to get the mapped port. We can use the convenience command docker port.

OK! We’re almost there. Now terminate that docker process and start with a new command to start our redis server within docker in daemon mode. Test the results with a telnet session and a redis-cli session external to the docker container.

docker run -d -p 6379 -i -t johncosta/redis /usr/bin/redis-server

vagrant@vagrant-ubuntu-12:/opt/go/src/github.com/dotcloud/docker$ docker ps
ID             IMAGE                    COMMAND                CREATED         STATUS         COMMENT
c0f7e48cafcf   johncosta/redis:latest   /usr/bin/redis-serve   4 minutes ago   Up 4 minutes
vagrant@vagrant-ubuntu-12:/opt/go/src/github.com/dotcloud/docker$ docker port c0f7e48cafcf 6379
49174

vagrant@vagrant-ubuntu-12:/opt/go/src/github.com/dotcloud/docker$ telnet 10.0.3.30 49174
Trying 10.0.3.30...
Connected to 10.0.3.30.
Escape character is '^]'.
monitor
+OK
+1365194060.897490 "monitor"
set docker awesome
+OK
+1365194071.640199 "set" "docker" "awesome"
get docker
$7
awesome
+1365194073.519484 "get" "docker"
quit
+OK
Connection closed by foreign host.

vagrant@vagrant-ubuntu-12:/opt/go/src/github.com/dotcloud/docker$ redis-cli -h 10.0.3.30 -p 49174
redis 10.0.3.30:49174> get docker
"awesome"

Update 5/6/2013:

It’s now possible to save images with their configuration options! I added one additional commit to do this:

docker commit -run '{"Cmd": ["/usr/bin/redis-server"], "PortSpecs": [":6379"]}' b9859484e68f johncosta/redis

Now to run an image it’s as easy as:

Get the image: docker pull johncosta/redis

Run the image: docker run johncosta/redis

Run in daemon mode: docker run -d johncosta/redis

Also, Check out the docker index.


la fin

by John M Costa, III

Django view decorators

I recently worked on a project that required a standard account and profile system. django-userena is usually my goto project for this due to its ease of setting up and its extensibility. There’s a subtle nuance to using this project’s default urls patterns in that the majority of the url patterns require passing the user’s username in the url. The username is then used in the view to find the user, since usernames are unique to the user.

For this particular project, I wanted to hide the username from the url path and came up with the following decorator that would allow us to use all the existing functionality of django-userena.

from functools import wraps

from django.core.urlresolvers import reverse
from django.conf import settings
from django.http import HttpResponseRedirect
from django.utils.decorators import available_attrs

LOGIN_URL = getattr(settings, 'LOGIN_URL')


def user_to_view(view_func):
    """ This view decorator is used to wrap views that require a user name,
    injecting the username, pulled from the request, into the view.
    """
    def _wrapped_view(request, *args, **kwargs):
        if not request or not request.user:
            return HttpResponseRedirect(reverse(LOGIN_URL))
        username = request.user.username
        kwargs.update(dict(username=username))
        return view_func(request, *args, **kwargs)
    return wraps(view_func, assigned=available_attrs(view_func))(_wrapped_view)

Now, for the each url pattern you want to modify, redefine it in your urls.py file, wrapping the url you’re looking to modify.

urlpatterns += patterns('',
    url(r'^edit/$', user_to_view(userena_views.profile_edit),
        {'edit_profile_form': ProfileFormExtra}, name='userena_profile_edit'),)